Event Manager allows you to manage your corporate evens with timed event postings that can be scheduled for inclusion on the site at a specific time. Events are are automatically added to the Event module display widget which automatically categorizes them for display in either chronological order or by content category.
To access Event Manager, you have two options.
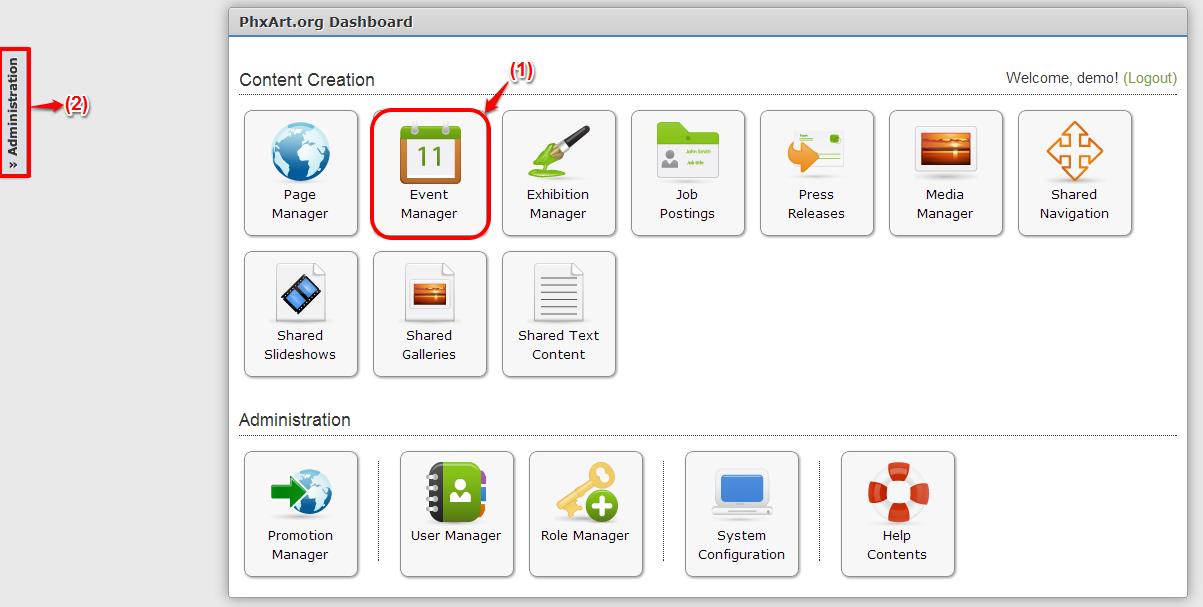
(1) You may click on the Event Manager module on the Dashboard as shown below:
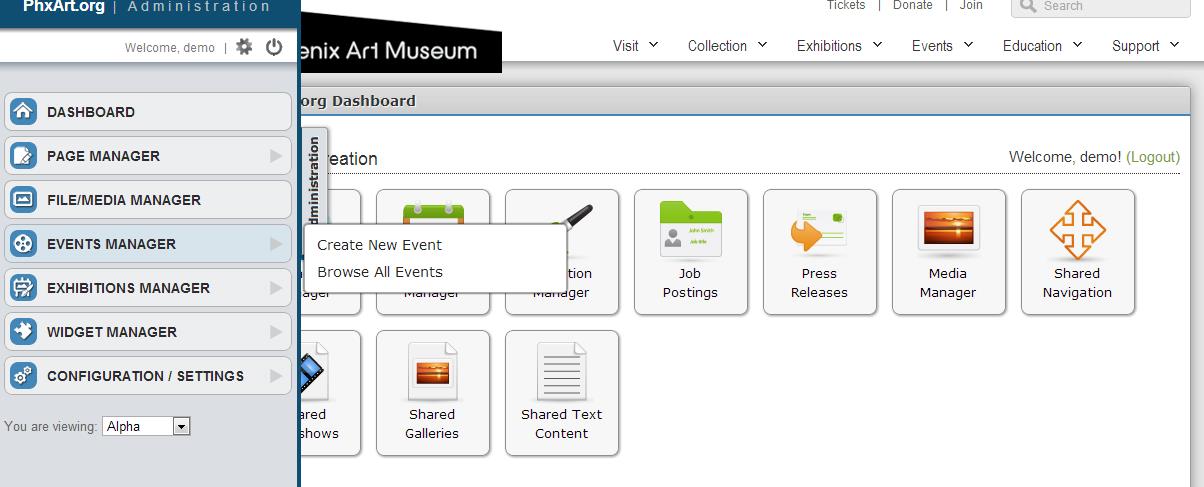
(2) You may access Event functions using the Administration tab (outlined with a red box above). By clicking on the “Administration” tab, you are presented with the following menu listing.
By mouse-hovering Events Manger, you get a submenu to the right of the button where you can choose either “Create New Event” or “Browse all Events.”
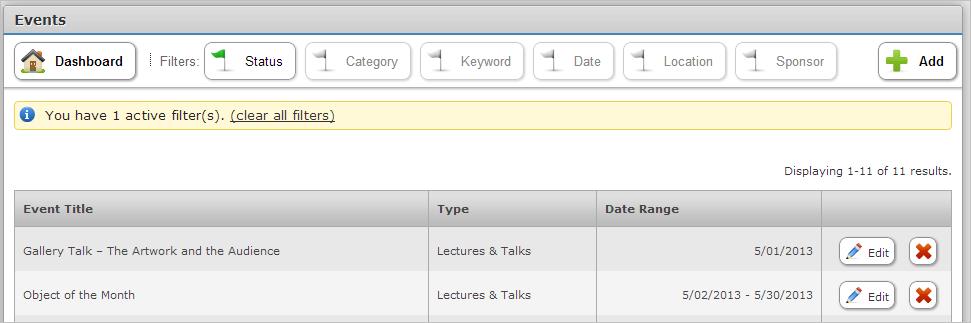
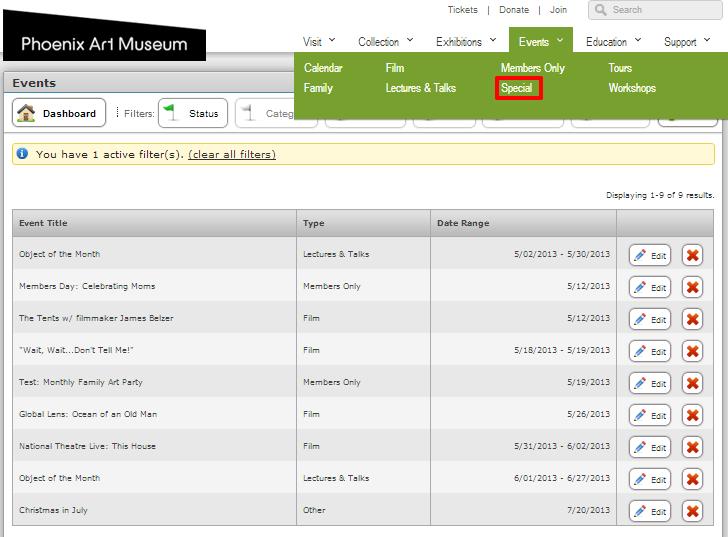
On the Events Manager (aka Events) module, the following functions can be performed:
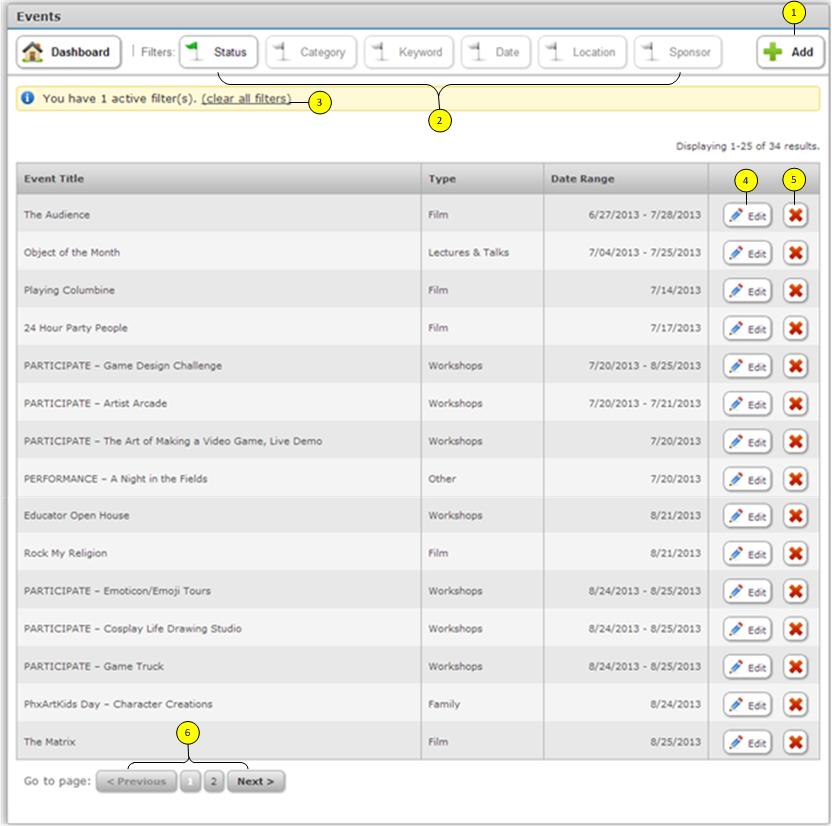
- Add New Event
- Sort using “Filter” buttons
- Clear all filters
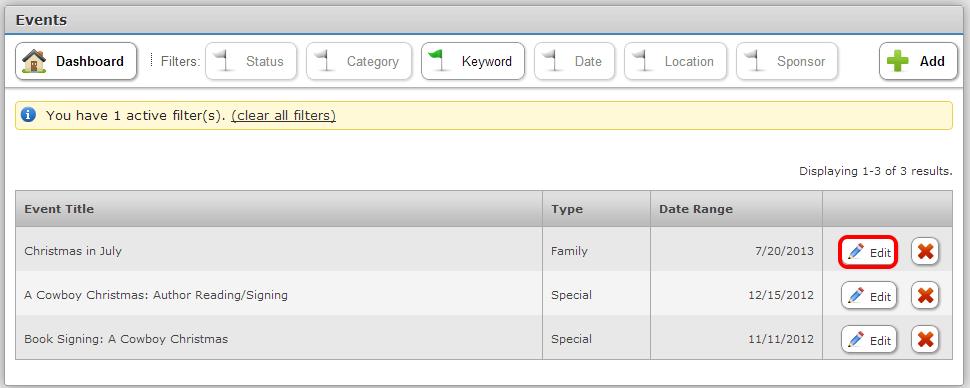
- Edit a specific event
- Delete a specific event
- Go to other pages
- Return to Dashboard
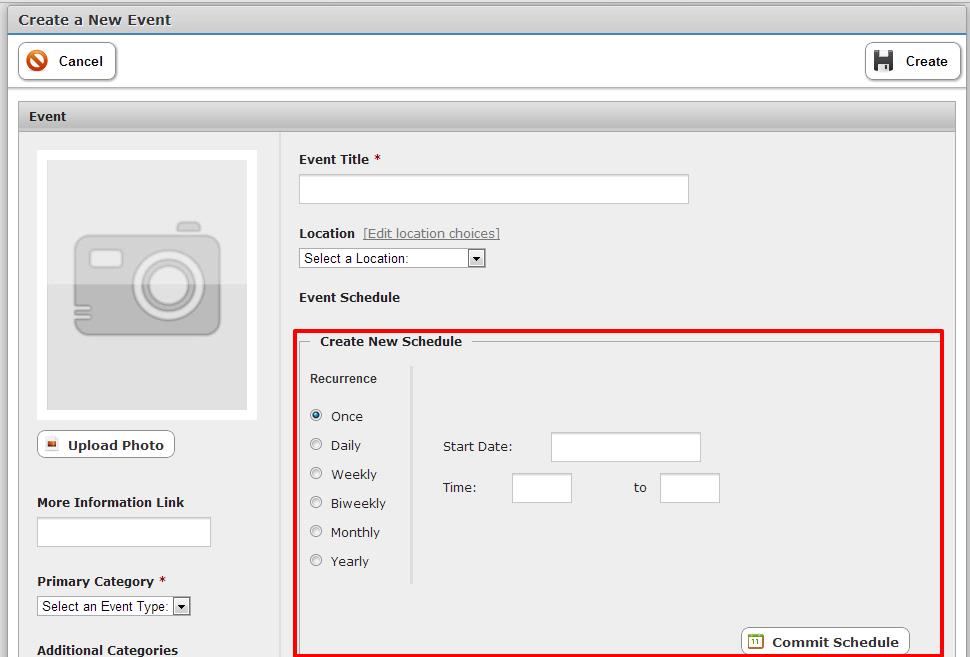
How to Create a New Event
Click “+ Add” button on the “Events” Module. You will get the following screen: (See numerated explanations on the following pages).
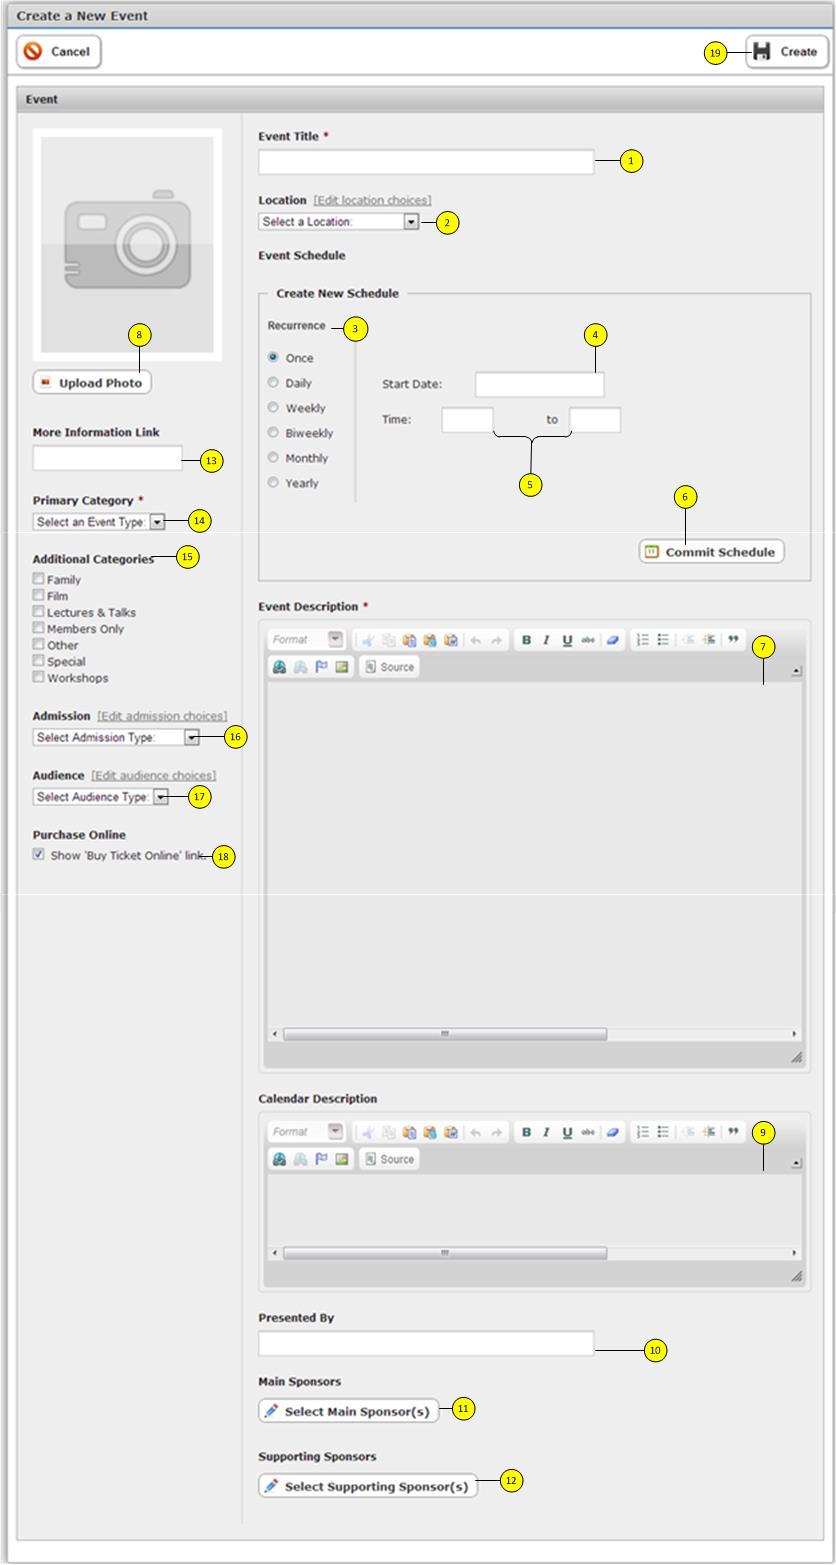
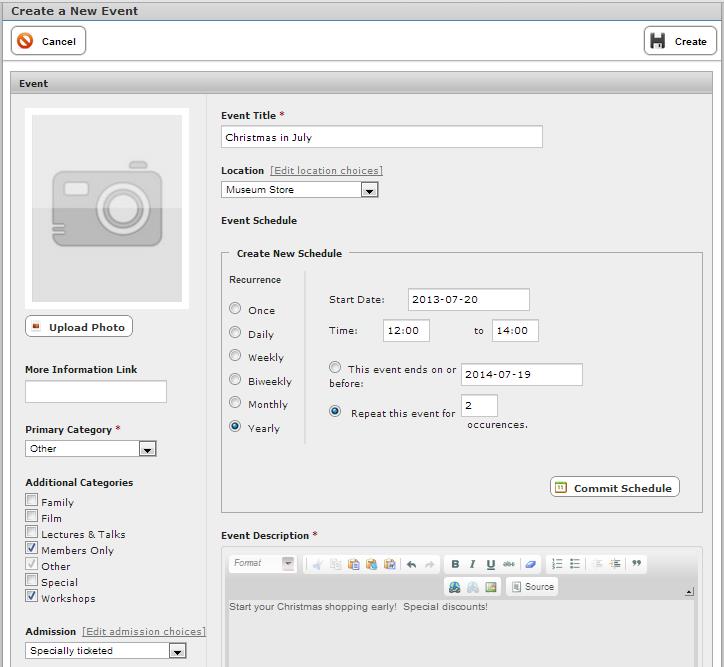
1. In the Event Title cell, enter your title.
2. Under Location, select the location from the drop-down menu.
3. Under Event Schedule, choose the recurrence (the number of times the event occurs). Note: (See Page 29 for Explanation of Recurrence.)
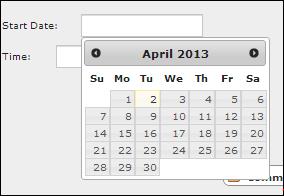
4. Enter Start Date. Click in the cell, a calendar will drop down. Repeat this process for End Date. (See the following Example of calendar drop-down)
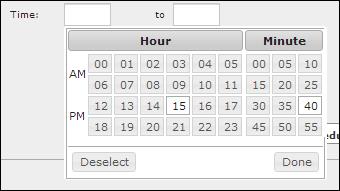
5. Enter Times. A time chart with the times will drop down; click on the desired time; click done.
6. Commit Schedule. Once you enter start date and times, click the “Commit Schedule” button.
7. Event Description: This is where you would type an event description. Note that it has many of the same editing features as a word processing program. This cell must be completed.
8. Uploading Images: Using “Upload Photo” button on the Event module, access desired photo. This sub-module will appear. You have the option to add image file(s) or access the site’s Media Library.

9. Calendar Description. This area is meant to display brief text descriptions that will appear on the calendar.
10. “Presented by”: This is to enter a sponsor’s name to appear to the public on the Event page.
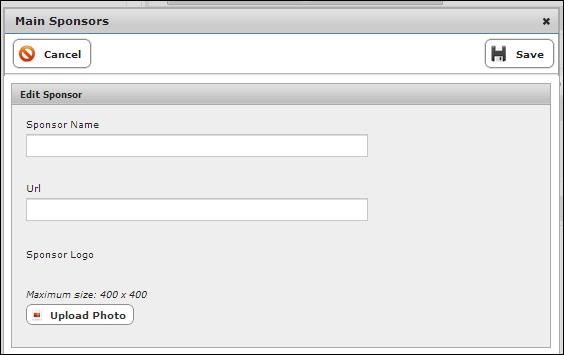
11. Main Sponsors: When selected, this button brings up a page containing a list of sponsors. To select one of the sponsors to appear to the public on the front end page for a particular event, click the check box; click “Save”.
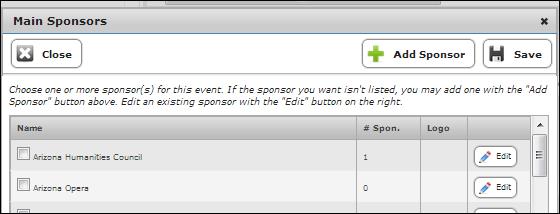
12. To add a sponsor, click “Add Sponsor”. Another sub-screen will appear. Enter information and press “Save.” Select Supporting Sponsors: This requires following the same steps as with the “Add Sponsor” option.
13. More Information Link: This cell offers you the option to add a link to files or sites to provide information for access by the front-end web page user.
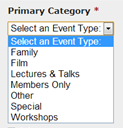
14. Primary Category – This category contains a drop-down of categories. (see the following example from Event module). *Note: you must select from this menu before choosing from the additional categories.
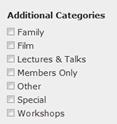
15. Additional Categories – This allows you to show the Event in other categories in addition to the primary category. Click on the checkbox to select an additional category or categories (See the following example from Event module).
(a) Drop down that lists types of admission to an event (see the following example from Event module).
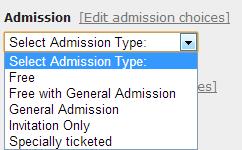
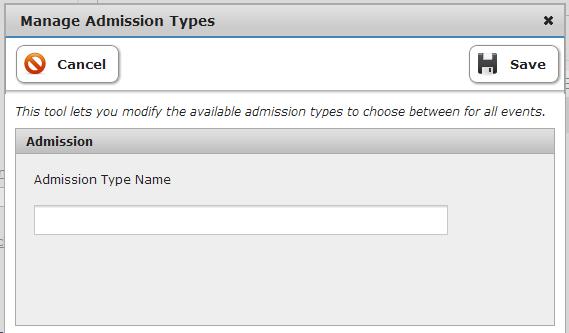
(b) [Edit admission choices] : This is a link that allows you to access the “Manage Admission Types” submenu. To add a new admission choice, click “Add”, type in new admission choice, then click “Save” button. To delete an admission type, open the admission type and click the X Delete button.

17. Audience. There are two options:
(a) Drop down that lists types of audiences to an event; (see the following example)
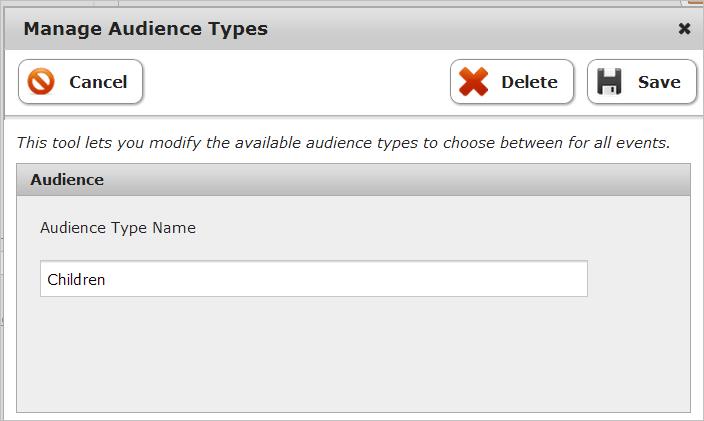
(b) [Edit audience choices] link which allows you to access the “Manage Audience Types” submenu. To add a new Audience choice, click “Add”, and another submenu is presented. Type in new Audience choice, then click “Save” button. To delete an audience type, open the audience type and click the X Delete button.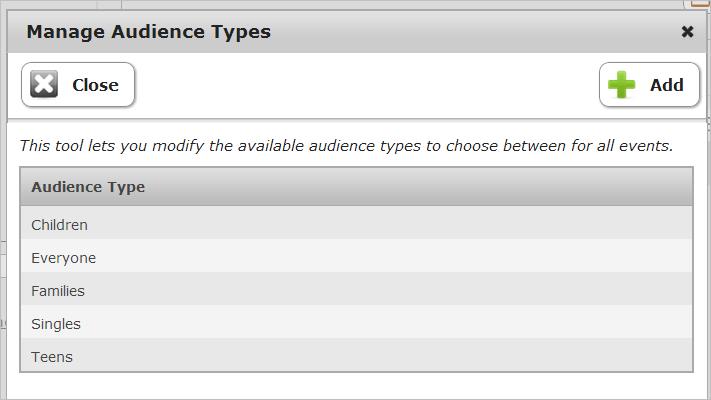
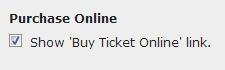
18. Purchase Online – The purpose is to make available to front-end web site user a link for purchase of tickets for events on the relevant event page.
19. When you have completed all information on “Create a New Event” module, click “Create”.
How to Edit an Existing Event
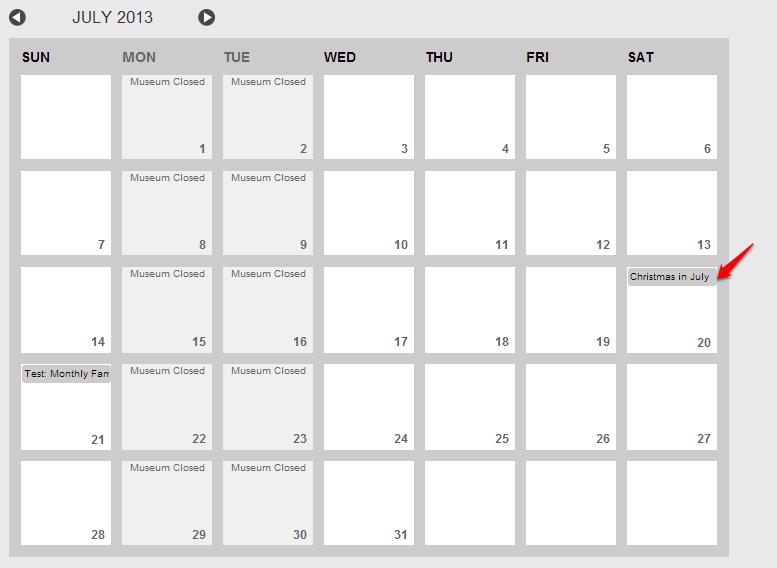
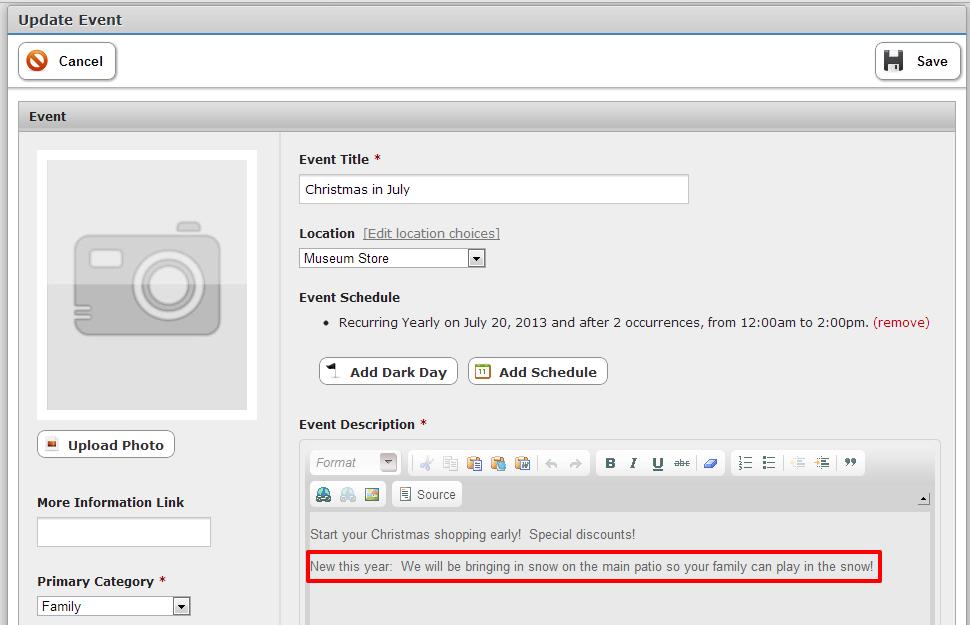
From Dashboard or Administration Tab, click “Event Manager.” You will land on this page. For our example, we demonstrate an edit “Christmas in July.”
The added text can be seen next to the red arrow. Next, you would click “Save.”
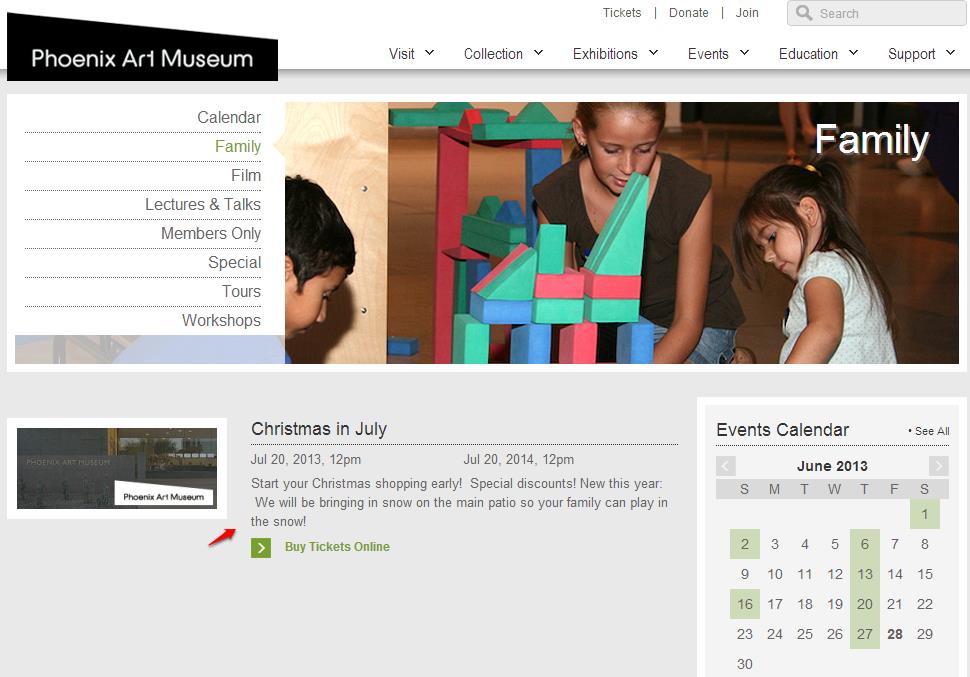
To view the change on the front end, click Events on Top Navigation and click “Family”:

These screenshots show that the change has been made on the both the Family page and the Members only page.
Explanation of Recurring Events
On the “Create a New Event,” you have the option to choose the recurrence; that is, the number of times you want to repeat the event on the calendar.
If you select “Once” (see above) on the radio button selections, the event would occur once and would be posted on the calendar page.
To Create a Recurrence for Daily
See the following test example of daily recurrence.
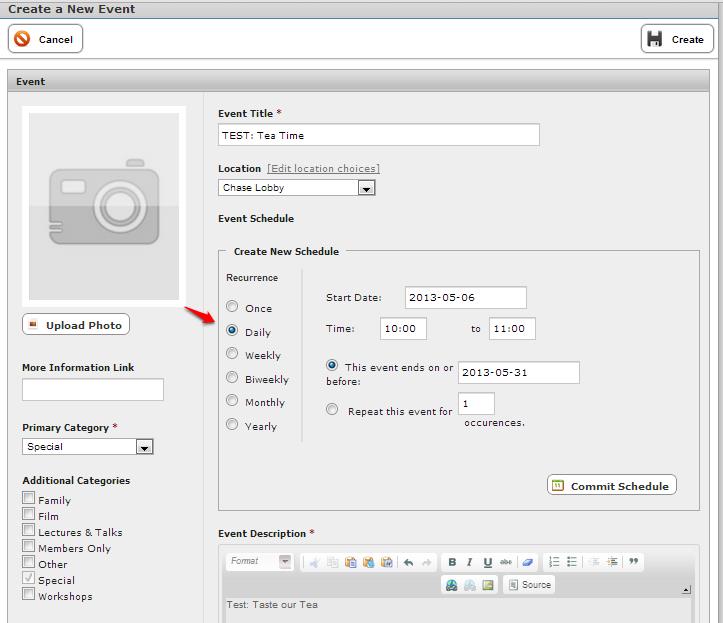
After completing all items on “TEST: Tea Time,” click “Commit Schedule.”
You will see the following message:
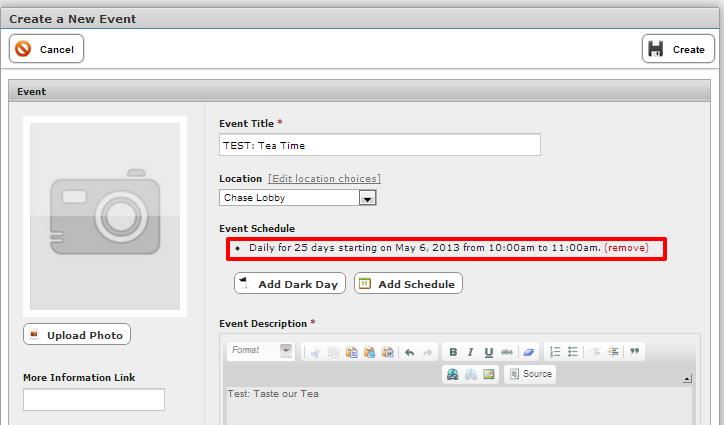
Click “Create.” (Note: If not the right schedule, click (remove)).
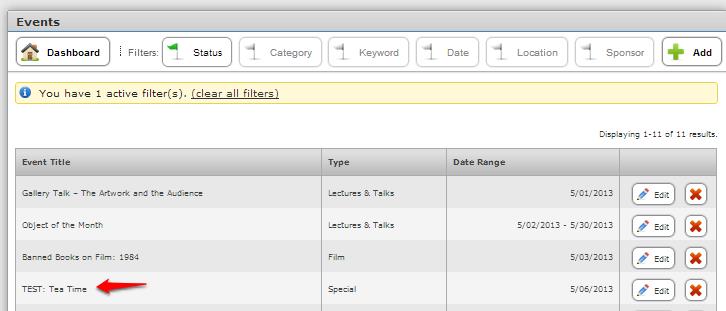
You will be returned to the following screen. Note that “TEST: Tea Time” is on the Event Title list.
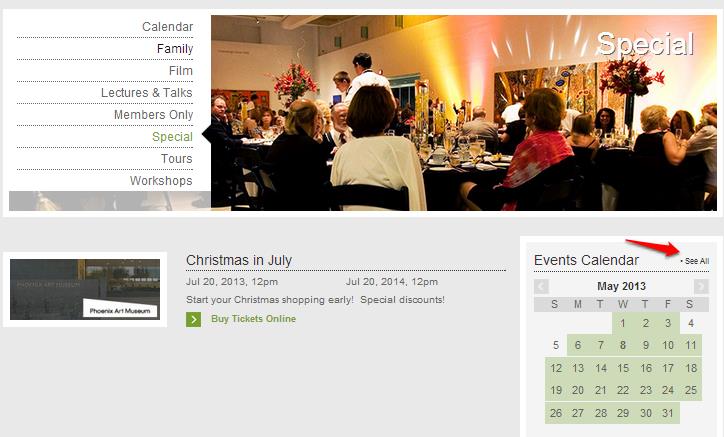
To view the new event on the calendar, mouse over top navigation; under “Events,” click “Special” (see below):

You will arrive on the “Special” page, where you will see the events calendar, as well as the event and description (within the red box). If you click “See all” (see red arrow) you will get a detail of the calendar.
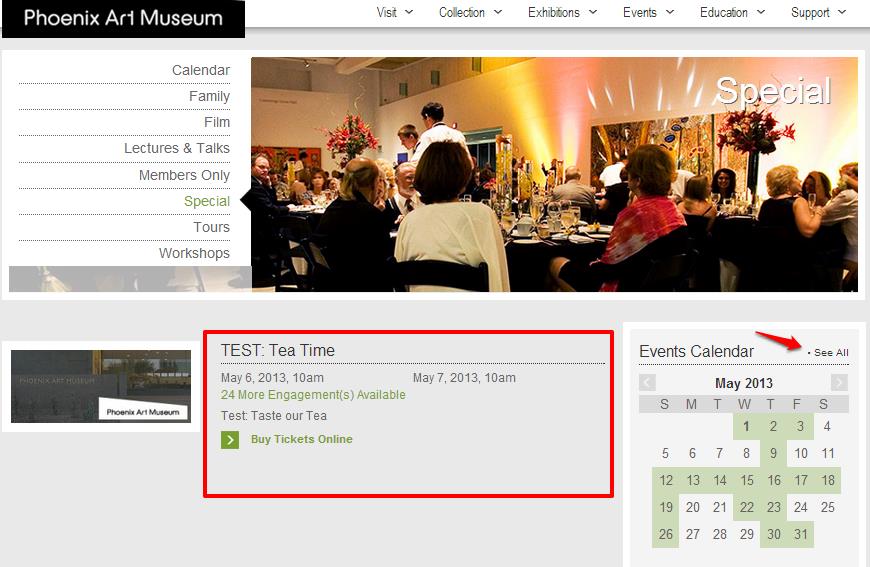
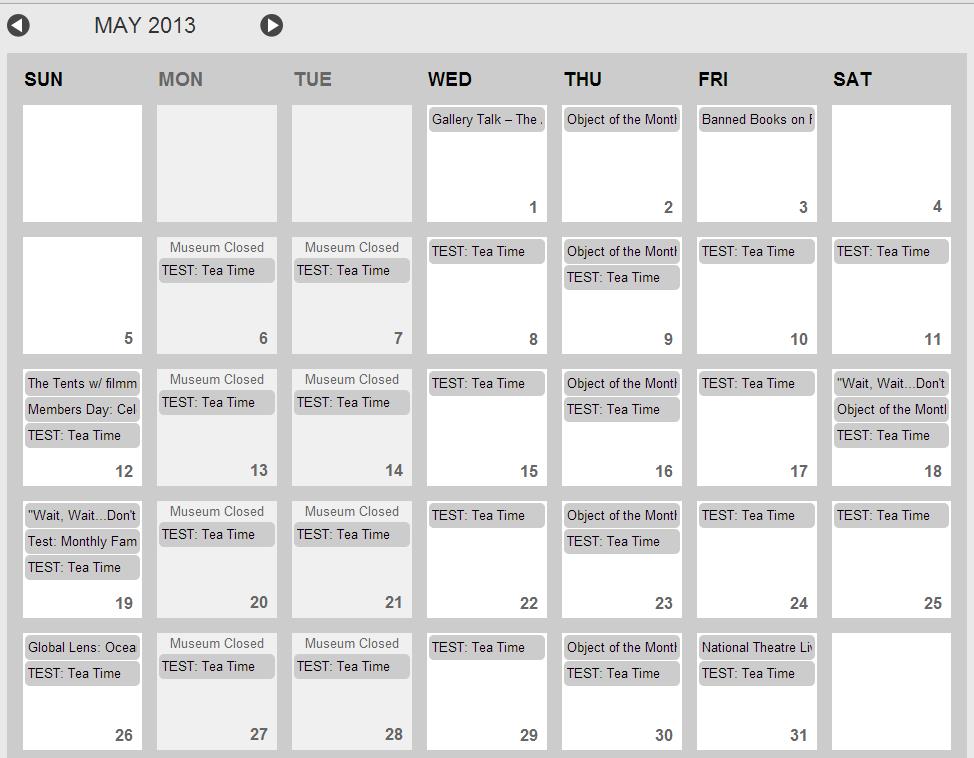
As you can see from this example, “TEST: Tea Time” appears on the calendar daily from May 6 through May 31, 2013. (Note: you may need to do a “refresh” on your browser to get the calendar update).
To Create a Recurrence for Weekly
The module looks slightly different, but the procedure would be the same. See below:
On Events page, click “+ Add”
On “Event” page, complete information (TEST: Coffee & Conversation is sample scenario). Click “Confirm Schedule”.
The screen will look like this (New comment is highlighted by red box on example):
If the information under Event Title* is correct, you would click “Create.”
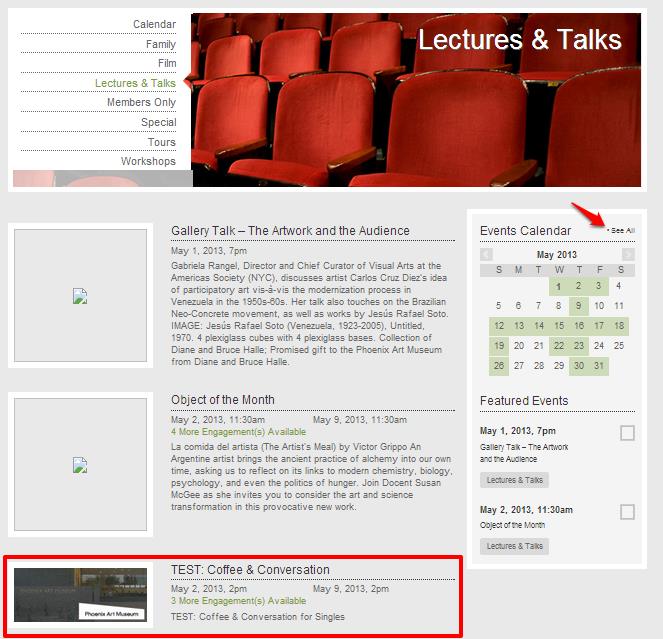
To view the new event just created, go to Top Navigation, choose “Lectures & Talks.” On the “Lectures & Talks” page, you will see that the new “TEST: Coffee & Conversation” event has been added to that page. (See red box that outlines the event).

Also, if you click “See All” (see red arrow on above event), the full-screen calendar for May would appear, showing the weekly event.
How to Create a Biweekly Event
Here is an example of a biweekly Event module.
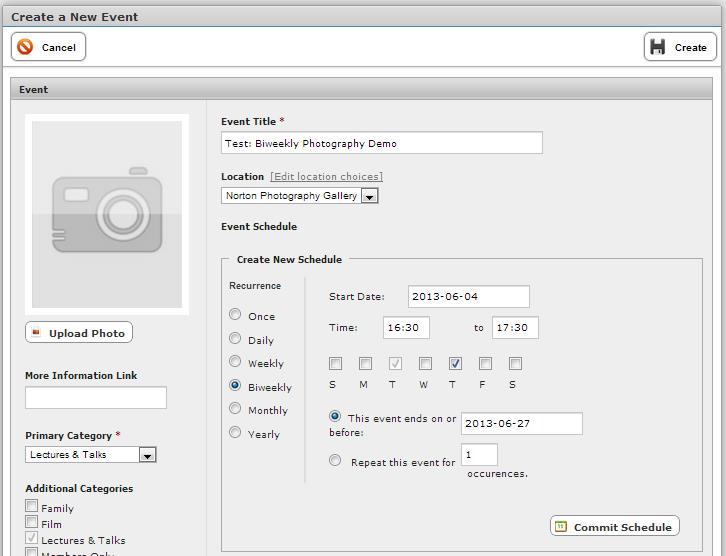
The steps would be similar to weekly recurrences procedure previously discussed.
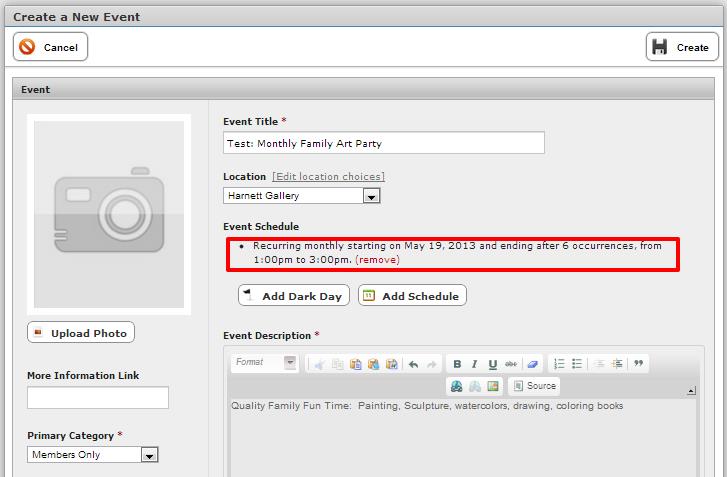
How to Create a Monthly Event
In this example, “Test: Monthly Family Art Party” is being created. The location, primary category (Members Only) and Additional Category (Family) have been selected. On recurrence, dates and times have been entered. After information has been entered, click “Commit Schedule.”

You will get this screen, with a message similar the one below (boxed in red, see next page for example). If this message is correct, you would click “Create.”
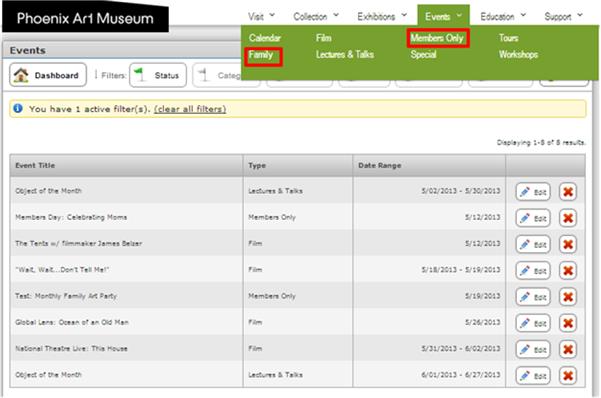
You will land on the next screen: See the new event title (boxed in red on the following example).

To verify that the event is showing on the appropriate pages, go to Top Navigation, “Events”. Click “Family”; you will get the “Family” page. Note that the event appears on the page. Click “Members Only.” The event announcement also appears on that page.
Next, on the ”Family” page, click “See All.” This will take you to the May Calendar.
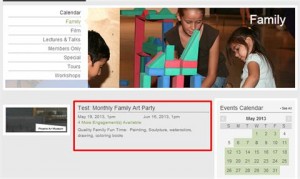
If you mouse-over May 19, you can see the entire event title (outlined in red on the next example).
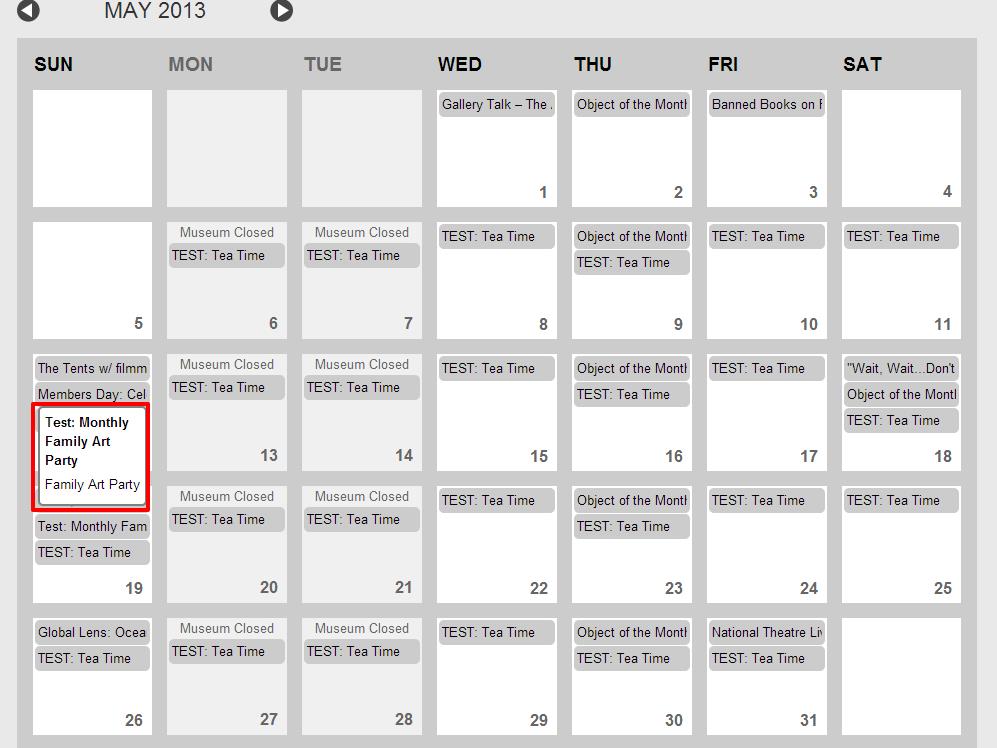
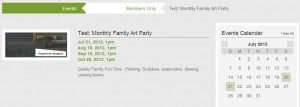
Finally, mouse-over then click click the Event Calendar event cell for May 19.You will land on the “Test: Monthly Family Art Party Page.” This page lists all the recurring dates for this event.
How to Create an Annual Event
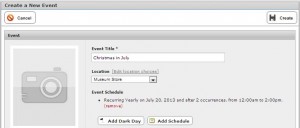
Creating an annual event is quite similar to creating a monthly event. After completing necessary information, click “Commit Schedule.”
When you get the following screen, verify that the information under “Event Schedule” is correct. Click “Create.”
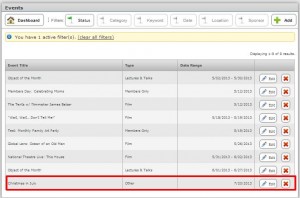
You will land on the screen shown in the following example.
Note “Christmas in July” event has been added.
On Top Navigation, select Events/Special.
You will arrive on the following page, which now shows the new event, “Christmas in July.”
Click “See All” and you will open the large events calendar. You will land on the calendar for the current month. If you cursor over to July 2013, you will view the following: